You can wire a light fixture with different wire colors yourself. However, it can be overwhelming and dangerous if you don’t know the basics, including the purpose of these colored wires. In this article, you’ll gain valuable insights and confidence to install light fixtures with red, black, and white wires.
Generally, wiring a light fixture involves these steps:
- Attach the white wire to the white wire inside an electrical junction box (also called a “jbox”); and
- Locate the black wire on your new light fixture then attach it to the black wire in the jbox. If the light fixture has a red wire, it’s for the light switch. It should be the wire you use.
Read on to know the meaning and proper use of color-coded electrical wires and the general steps for installing light fixtures.
Electrical Wire Colors Meaning
Electrical wire colors are essential. Regardless of the function, all wires will deliver a current at some point. So, get a professional electrician to do the job as much as possible. By following the correct way of pairing and installing these wires, you could prevent fires, electrical shocks, and damage to your light fixtures and home appliances.
In general, electrical wires could be hot, neutral, or ground. Below, I’ll explain further the function of the following electrical wire colors:
- Black
- Red
- Orange
- Green
- Blue
- Yellow
- White
- Gray
1. Black
Black is the color of “hot” or “live” wires. Meaning, these wires carry a live current that goes from your breaker panel (also called an electrical panel) to the destination. They feed power to light fixtures, appliances, electrical outlets, and switches. You’ll usually find black wires in residential buildings.
Black electrical wires also function as “switch legs,” link wall outlets and switches. They become energized and transfer power to a device or fixture when you turn on the switch.
Reminder
Remember that black wires are “live.” So, always follow the proper safety precautions when dealing with them to prevent electrocution. For instance, shutting down your home’s main electrical panel or the circuit breaker(s) you’re currently working on.
2. White and Gray
Neutral Wires
If a wire is white or gray, it means that it’s neutral. Electricians usually use white wires in residential settings, while gray wires are more common in commercial settings.
Once a live electrical current leaves the electrical panel (the metal box with a door built into a wall), it passes through the circuit’s hot wire through different appliances or devices, such as a light bulb. After that, the electrical current goes back to the service panel by passing through the neutral white wire.
If neutral wires aren’t present, there’s no way for electricity to go around. As a result, a live wire can’t deliver usable power.
Function as Hot Wires
White or gray wires could also function as hot wires. Typically, both ends of these wires have colored electrical tape (black or red) that matches their new function.
Reminder
Neutral doesn’t mean these wires won’t electrocute you. White or gray wires still carry a live current. Thus they still pose a danger of electrocution if you don’t handle them correctly.
Another thing you need to remember is you can only connect white or gray wires with other white or gray wires.
3. Red and Orange
Red wires carry a live current, so they are “hot.”
Aside from connecting two red wires, you can also connect a red wire to a black wire. Similar to a black wire, it can act as a switch leg.
When it comes to wiring lighting fixtures, the purpose of a red wire varies. However, in most cases, it’s not that difficult to determine. Ceiling fans often have a hot red wire to operate the light, while the hot black wire operates the fan motor.
Note that you can use orange wires as replacements for red wires.
4. Green, Green with a Yellow Stripe, or Bare Copper
Ground Wires
Green wires are commonly ground wires. A ground wire is connected to a ground metal rod buried around 6 inches into the soil or 4 inches into a 4-inch concrete slab.
Act as a Secondary Fail-safe Path for Excess Electricity
The main purpose of a ground wire is to act as a secondary fail-safe path for excess electricity during a short circuit, so it flows back outside of your home and into the ground. As a result, it keeps you and your home (including your appliances and lights) safe from electrical overload, which could lead to a fire.
Reminder
Don’t repurpose green wires if you don’t want to cause electric shocks or fires. They’re used only for grounding. Since they’re current-carrying wires, treat them cautiously.
Also, note that green wires connect only with other green wires. Lastly, you can use green with yellow stripe wires and bare copper wires (without colored insulation) as alternatives to green wires.
5. Blue and Yellow
Blue and yellow electrical wires are common in commercial settings. Electricians do not use these wires for outlet wiring, but you can generally find them in more complex circuits.
Blue and Yellow Wires Function
Specifically, blue wires act as “travel wires” for three- or four-way switches. On the other hand, yellow wires are switch legs in ceiling fans, structural lights, and light switches and outlets on a single circuit.
Travel Wires
What are travel wires? This type of wire supplies power between a multi-way (three-way or four-way) switching structure. This gives alternative pathways to complete the electrical circuit and deliver power to the destination (e.g., light fixture).
These are just a few of the colors used for identifying the function of every electrical wire. Color combinations, such as striped wires, are also available for other applications.
Again, how to wire a light fixture with red, black, and white wires? Locate the red or hot wire from the switch. Then, connect it to the black light fixture wires. Meanwhile, link the white wire to the white wire and ground to ground inside the junction or jbox.
Materials for Wiring a Light Fixture

Installing a new light fixture is typically a doable task for most homeowners who have basic knowledge of electrical wiring. If you have questions about the proper way of doing this, or if you have complex home wiring issues, it’s better to let a licensed electrician figure out the proper wiring for your light fixture.
You don’t usually need a lot of tools to wire a new light fixture. Here are some of the essential tools you’ll need for the job:
1. Screwdrivers
Straight screwdriver and Phillips screwdriver)
2. Pair of Needle-nose Pliers
This is typically used for manipulating electric wires using textured teeth.
3. Circuit Tester
A circuit tester has two wires (usually black and red) and LED lights. The purpose of this device is to warn you if the circuit is “hot,” the amount of voltage, and if the electrical polarity is correct or incorrect (or risk an electric shock).
4. Electrical Probe (Optional)
You can safely insert this device into the small slot on any electrical outlet and explore the inside of electrical panels and electrical wiring. If it touches any live wire, it’s going to produce a beeping or buzzing sound.
5. Flashlight or Headlamp
5. Stepladder
Can You Use Duct Tape to Insulate Electrical Wires?
Tips When Wiring a Light Fixture
1. Shut off the Power Supply
Turning off the switch doesn’t automatically mean that there’s no live current that flows through the wires in the electrical box. That’s why it’s important to shut off the power supply at the electrical panel and lockout the circuit breaker switchgear to make sure no one can turn it back on unknowingly.
2. Label the Circuit’s Switch You’re Working On
Next, place an easy-to-see tag or label on the switch on the circuit you’re working on. It serves as a warning for family members not to start or touch it.
3. Use a Circuit Tester to Determine Whether You’re Working on a Live Wire
If your electrical panel has no labels, use a circuit tester or voltage detector to determine if the specific area you’re going to be working on is hot (“live”). You could also ask someone to turn on the light fixture with the switch, so you could cycle through the circuit breakers until it turns off.
Step-by-Step Guide on How to Wire Your New Light Fixture
There are many ways to wire a light fixture. In most cases, if there’s one light fixture and switch, it’s usually a straightforward task that most homeowners can do.
Below, I’ll discuss the usual steps for wiring lights with black, white, and red wires:
1. Loosen the Screws of the Switch’s Cover
Loosen the screws of the switch’s cover that’s used to operate the light fixture you’re going to replace.
2. Remove the Cover
Make sure to remember the colors of the wires that connect to each side of the light switch before taking the old light fixture down.
If there are white wires at one side and black wires at the other side of the switch, it means one pair of the black and white wires will connect to the corresponding black and white wires that run to the switch’s electrical panel. Meanwhile, the other pair goes to the light fixture.
What If Your Light Fixture Has More Than One Lamp?
It might have a pair of black and white wires for each of its lamps. These wires will connect to the corresponding black and white wires in the electrical panel with the provided wire nuts.
Wire nuts are small plastic caps for making tight connections. Depending on the manufacturer, they’re usually the same color as the light fixture wires, such as black, red, or yellow.
Tip: If your old fixture was working properly, its old wiring pattern is your best reference. Use your cell phone to take several snap pictures to make sure you get things right later.
3. Take Out Your Old Light Fixture
If there’s twisting or crimping of the wires, which is common in old homes, one of the best ways of removing your old light fixture is to cut the wires on the back of the connection. But, don’t cut them too short (more than 3/4″ of sheathing) that there’s not enough left to make new connections.
If wire nuts are present, loosen them first to straighten out the wires. You might still need to cut the wires so that you can make clean, straight connections for your new light fixture.
Note: The correct way of removing your old light fixture will depend on how you previously installed it.
4. Wire Your New Light Fixture
Use the pictures you took of your old light fixture’s wiring pattern earlier as your reference.
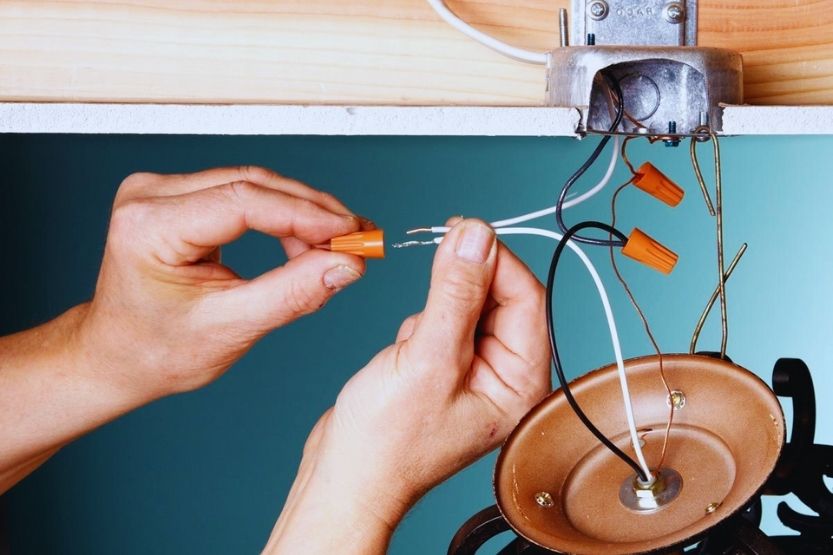
Twist the wires with the same color together, and then install the wire nuts. If you want more specific steps, follow these:
- Attach the white wire to the wire in the jbox (or the junction box).
- Take the black wire and attach it on the new light fixture to the black wire.
- If there’s a red wire (for the light switch) present, use that instead. But to be completely sure, read the installation instructions to know which of these wires connect with the red wire.
- Others feel more comfortable connecting the plate, which connects to the screw holes on either side of the box, before connecting the wires. This would be a practical step if the light fixture that you’ll need to install is heavy, thus it requires to be properly supported while you’re connecting the wires to the ceiling wires.
Conclusion – How to Wire a Light Fixture With Red, Black, and White Wires
As I’ve pointed out earlier, these are just general steps for the most straightforward wiring situation—black, red, and white wires. In most cases, homeowners who know the basics of electrical wiring installation could do this without serious problems.
However, certain situations could complicate things, such as when the following circumstances are present:
- Installing a ceiling fan with lights
- One circuit with many light fixtures
- Three- or four-way switches
- Light fixtures that have integrated dimmers or other light switch controls
Remember: It’s always a good idea to hire an experienced licensed electrician to perform the installation.
Read next: