
Your toilet flange must be evenly leveled and set to the right height because if it is not, it will wobble and may even leak at its base. In this article, I’ll discuss proper toilet flange height and how to set it.
To set the proper toilet flange height, aim for a 1/4 inch distance of the flange from the floor or tiles. You can use any wax ring if the top of the flange has this distance from the floor. This height will ensure a good seal for the flange.
The toilet flange should never be at the floor level. It should be set on top of the toilet floor. This means the bottom edge of the flange should be sitting on the floor level of the toilet. So, if you cover the toilet floor with tiles, the bottom edge of the flange should sit on top of the tiles.
Read on to learn more about the proper flange height setting and how you can correctly set the height of the flange.
Toilet Flange Height – Proper Height

You can set the right flange height from the toilet floor if you measure 1/4 inch from the floor to the top of the flange. With this distance from the floor, you can use any wax ring. You will also ensure a good seal for the flange.
The flanges should never be flushed on the toilet floor. It should be on top of the finished floor. If you cover the toilet floor with tiles, the flange should sit on top of the tiles. In other words, the bottom of the flange should be on the same plane as the toilet floor.
The flange should not also be too high from the toilet floor. If it is, the toilet may leak water, or it can also rock back and forth while it is being used.
Whichever of these two occur, it can break or warp the toilet floor. Also, if the flange leaks water, the subfloor will rot away. This can lead to mold and mildew growth.
So, the proper height of the flange from the floor is 1/4 inch. The floor could be the base floor or the floor already covered with tiles.
If the toilet flange height is too low, it would appear flush from the base toilet floor if you cover it with 1/4-inch tiles. But when you examine it closely, the flange is still 1/4 inch above the toilet floor.
The optimum height of the flange is 1/4 inch. If you want to get your flange flushed with the floor, you need to lay the flooring before you install the flange.
What Is a Toilet Flange
Toilet or Closet Flange
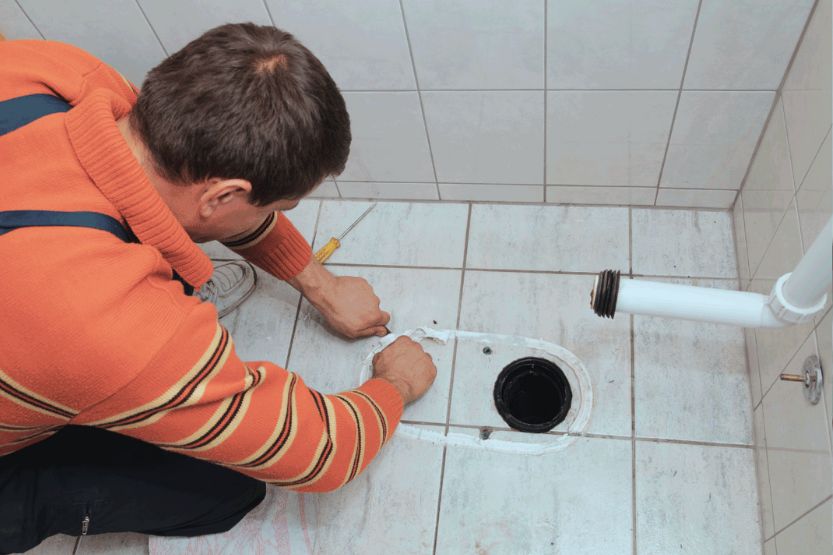
The toilet flange is also called a closet flange because of its association with the water closet. The metal, rubber, or PVC ring sits on the toilet floor.
Usually Located Beneath the Toilet
This flange is usually located beneath the toilet and stretches into the drain pipe. The material it is made of will vary depending on where you live and the age of your house.
Seals the Toilet to the Floor
This flange also seals the toilet to the floor using a wax ring. The ability of this ring to create a watertight seal to the toilet depends on the flange’s height and the tightness of the flange bolts.
Toilet Flange That Is Too High
So, if the toilet flange height is too high, the toilet may rock back and forth when it is being used. It may also leak. The rocking back and forth and leaking can break the floor or, at the very minimum, warp it.
It will also rot the subfloor if water leaks from the flange. With the continuous presence of moisture, you will also have mold and mildew growth problems. You should be aware that this flange connects the toilet to the waste line of your house.
This is why you must ensure that the flange is fully level with the toilet floor. You will have a wobbling and leaking toilet if it is not evenly leveled. You have to fix it to be at its correct height.
Correctly Sealed Flange Prevents Unpleasant Odor from Escaping
As you can see, if the flange is sealed correctly, it also prevents unpleasant odor coming from the toilet from being released into the room. So, before installing the flange, you should measure the floor height or thickness if it can accommodate the height of the flange.
How to Properly Set the Flange Height to Prevent Leaks
It’s much easier to set the right flange height during the toilet’s initial installation. But it’s much more difficult to correct the height of the flange of a previously incorrectly installed toilet.
Whatever your situation, setting the proper flange height is more or less the same. Here is the process:
1. Confirm the Flange Height
Before you install the toilet, you need to know how to adjust the toilet flange height. First, confirm the correct flange height.
While the toilet is not yet in place, get the flange and measure its height above the floor. You should try to set it 1/4 inch above the finished floor. That is its optimum height when installed.
Why is this? This height will allow nearly all types of wax rings to be used. It will also ensure the tightness of the seal to prevent leaks. However, if you have already covered the toilet floor with tiles, the height of the flange from the finished floor will not be at its optimum.
You can still add the required clearance from the tile if you use a toilet flange extender. This flange extender is very easy to install.
You can buy either a 1/4 inch or 1/2 inch flange extender, whichever height you need for your flange. These extenders are supplied with long bolts. You will need these bolts if the flange is below the level of the floor.
2. Fasten the Closet Bolts
The base of the toilet has holes that are made to fit the flange. You will also be provided with long closet bolts when you buy a toilet bowl. Anchor these bolts to the toilet base and the flange.
Secure these bolts to the flange properly. Stick them straight up from the toilet to the flange and then tightly secure them. Typically, you will also be provided with the nut and the washer.
They should come with the long bolts when you buy the toilet bowl. Use these nuts and the washers to secure the flange’s closet bolts on the top side. If you are forced to use a flange extender, secure the nuts and washers to the flange and not the extender.
3. Install the Wax Ring and Toilet
You need to use the right wax ring size for the toilet flange. The polyethylene plastic sleeve type is the wax ring that can provide the best seal. It is easier to use because it usually fits regular drains more.
If the height of your floor flange is less than 1/4 inch from the toilet floor, you need to use a wax ring with added thickness to compensate for the difference.
Don’t try to use two wax rings, one on top of the other. This arrangement will result in leaks in the future. Just settle for a flange extender because it will work better over time.
Put the wax ring on top of the closet flange, not the toilet. Get the toilet and set it evenly over the closet flange. Ensure the bolts come through the bolt holes in the toilet’s base.
Carefully set the right position of the toilet. It should be positioned correctly where it should be. Once you have set the toilet’s position correctly, push it straight down. It should be able to smash the wax evenly. Push it further down until its base is securely resting on the floor.
4. Check the Toilet’s Level
Make sure that the toilet is level and stable on the floor. You can do this by rocking it from side to side, front and back. It should sit perfectly flat on the floor. If not, it will rock and will eventually leak at a future time.
If the toilet is rocking, place some toilet shims between its base and the floor. This will prevent it from rocking. Once you are sure that the toilet is stable and level and no longer rocking, you can now secure the bolts to the flange and the toilet floor.
Secure each bolt with the provided nuts and washers. Do not over-tighten the nuts to the bolts. The nuts should be snug and not overly tight on the bolts.
5. Caulk the Toilet’s Base
Get a utility knife and cut off any protruding part of the shims that you have used to level the toilet to the floor. Then caulk the base of the toilet.
The best caulking material you should use is silicone caulk because it can provide greater protection against unavoidable toilet movements in the future. Silicone is also easier to clean, so you won’t have any difficulty keeping it clean.
You can also choose to leave the back portion of the toilet base un-caulked so that the water can flow out from there if the toilet leaks. This will get your attention before the leaking water damages the toilet’s subfloor.
Again, what is the optimum toilet flange height? Once you remove the toilet, you can measure the toilet flange’s height. Install the toilet flange 1/4 inch above the floor. This height ensures a good seal. Plus, you can use any wax ring with this flange’s height.
Why Your Toilet Is Not Flushing All the Way Down
How to Install a New Toilet Flange

Now, if you have a toilet flange set too high, you can expect problems such as water leaks in the future. The toilet can also rock back and forth, leading to floor damage. This condition can also lead to rotting of the subfloor caused by the leaking water.
But don’t worry. There are several fixes to this problem. You can either replace the toilet flange or add grout as filler. You can even raise your bathroom floor, but that can be costly.
If you have no background in pipe fitting, plumbing, or the like, you may want to leave this work to a professional plumber or pipe fitter. Even then, you still should know how they will do this job. This is basically how plumbers do this work.
If the currently installed flange is too high from the floor, you need to replace it. So, you must remove this flange and the pipe fittings from the bathroom floor before installing the new flange.
Here is the process:
1. Remove the Toilet
Use a hammer and a chisel to remove the toilet and break off the outer flange. Be careful that you don’t damage the pipe connected to it. If the pipe is at a slight angle, you must make adjustments to break off the flange.
2. Get the Fitting Out of the Pipe
There is a fitting inside the pipe that you need to get out. You may have to make two score cuts which should be one inch from each other, on the inner side of the fitting. A sharp blade will be good for this task.
As you are cutting, ensure you don’t go deeper than the fitting. As soon as you make the two cuts, get a screwdriver to pop out the fitting inside the pipe. Be aware that the fitting could break off into small pieces.
3. Grind the Top of the Pipe
Now that you’ve cut the fitting and the flange’s outer part, you can grind down the pipe’s top. Continue grinding it until it is flush with the floor. You can use a PVC saw for this task.
4. Insert the New Flange
Once the pipe is flush with the floor, you can insert the new toilet flange. It is best to use a flange that goes into a pipe a few inches and one that can provide a watertight seal.
5. Drill Pilot Holes on the Floor
The next step is to drill four pilot holes into the floor. You will use them as the anchors for the toilet. If the floor is made of concrete, use concrete screws.
6. Set the Toilet to the New Flange
Carefully set the toilet to the new flange. Make sure that the toilet is stable and fully level on the floor. Then tighten up the screws on the toilet.
How to Correct the Flange’s Height by Adding Grout to Fill the Gap
Another option for correcting the height of the flange is to fill the gap with grout. This is how grout is used for this purpose:
1. Mix the Grout
Put a small amount of grout on a small plate and mix it with water. The mixture should be one part water to six parts grout. This should give you enough grout to finish this task.
2. Put Shims on the Toilet
Get four rubber shims and insert them into the bottom of the toilet. These shims keep the toilet from moving as you work on the flange.
3. Put the Grout on the Gaps
When the four shims are in place, there will be gaps between the floor and the toilet. Fill these gaps with the grout that you have previously mixed. Ensure all gaps around the toilet and the floor are filled up.
4. Let the Grout Dry
Give the grout one day or 24 hours to dry.
5. Remove the Shims
Once the grout has fully dried, you can now remove the shims. They may be difficult to remove, but continue doing it, and they will eventually come out.
6. Fill Up the Open Spaces
There will be open spaces where the grouts were before. Fill up these gaps with the remaining grout. Make sure all the spaces are filled up.
7. Allow the Grout to Dry Completely
Allow the grout in the gaps to dry fully.
8. Tighten the Nuts
Once the grout has completely dried, you can tighten the nuts to the bolts that hold down the toilet.
Frequently Asked Questions
The topic of correctly setting the height of a toilet flange may be very new to you, so you may have some questions you want to be answered. Here are the answers to the most often asked questions about this topic. You may find your answers here:
What Is the Proper Height of a Toilet Flange?
The optimum height of the toilet flange from the floor is 1/4 inch. This height or distance from the floor is the best height that allows nearly all types of wax rings to be used. It will also ensure a watertight seal for the flange and the toilet.
Should the Toilet Flange Be Flush with the Floor?
No, the flange should be above the top of the toilet floor. This means the bottom edge of the flange should be above or at least the same level as the toilet’s base. If you have covered the bathroom floor with tiles, the flange should be above the level of the tiles.
Can I Set the Toilet Flange Very High Than the Toilet Floor?
You can, but it is not advisable. Setting the flange too high from the toilet floor will cause water leaks in the future. It will also be easy for the toilet to swing back and forth.
This situation can lead to breakage of the toilet floor. When water leaks from the flange, it will also lead to the rotting of the subfloor.
In Closing: How to Set Proper Toilet Flange Height
You can set the proper height of the flange if you aim for a 1/4 inch distance from the flooring. With this height, you can use any wax ring. It will also ensure a good seal for the flange.
The bottom part of the flange should never be set at the same level as the toilet floor. It should always sit on top of the floor. So, if you have covered your toilet floor with tiles, the flange should sit on top of the tiles.
Read next: