The function of a vent is to make sure that your washer’s drain pipe does not overflow. This alone is reason enough why you should know how to vent a washing machine drain pipe. But there are other factors to consider as well.
If your washing machine doesn’t have a vent, it will cause the drainpipe to overflow because of excessive pressure. Aside from this, it can also affect the performance of the drain trap (P-trap). This keeps dangerous and even flammable gases from seeping into your house. But if you vent your washing machine drain pipe, you need not worry about risking your home from either hell or high water.
Read on to learn more about venting a washing machine drain pipe.
How to Vent a Washing Machine Drain Pipe
Does your washing machine have a vent? If none, it would cause the drainpipe to overflow because of excessive pressure. Aside from this, it can also affect the performance of the drain trap (P-trap). This keeps dangerous and even flammable gases from seeping into your house.
So, make sure you vent your washing machine drain pipe. That way, you won’t worry about risking your home from either hell or high water.
Materials
To vent a washing machine drain pipe, you will need to use the equipment and materials listed below:
- 4-inch duct
- Tape measure
- Corded drill
- Drill bit set
- 4-in-1 screwdriver
- Vent cap
- Caulk gun
- Exterior caulk
- 4-inch elbow fittings
- Tin snips
- Metal foil tape
- U-shaped pipe straps
Here are the steps on how to vent a washing machine drain pipe:
- Choose the Vent Route
- Take the Measurements
- Buy the Necessary Materials
- Drill a Test Hole
- Drill the Vent Hole
- Install the Vent Cap
- Connect the Elbow Fittings
- Cut the Metal Duct
- Align the Seam Edges
- Connect the First Duct
- Connect the Remaining Duct Sections
- Screw the Vent to the Wall
- Plug in the Washing Machine
1. Choose the Vent Route
Choose Based on Washing Machine’s Location
The first step to vent a washing machine drain pipe is to choose the vent route. Make sure that it is in the shortest possible direction. Choose it based on your washing machine’s location.
When Washer Is Located in an Underground Basement
If your washer is located in an underground basement, you need to run the vent duct up. It will be passing through the exterior wall and rim joint. The vent should at least be 12 inches above the ground outside.
You will not need to use more than 25 feet of a 4-inch duct to run the vent from the basement. Just subtract 2 1/2 feet for every 45-degree turn and 5 feet for each 90-degree turn. For example, if you’re inserting 45-degree elbow joints in two points of the wall, you will run around 20 feet through the duct.
Washer Close to an Exterior Wall
If your washer is placed close to an exterior wall, you can just run it straight out. This is easier than running it from an underground location. The length of the duct required would also be shorter. But make sure that the vent is elevated by at least 12 inches from the ground outside.
Washer in an Interior Room
If your washing machine is located inside your house’s interior room, the vent will run through the roof and pass through the attic. But unless it’s a last resort, installing it through the roof is not advisable. This is because birds and squirrels tend to nest on the vent caps over time.
2. Take the Measurements
Help Verify the Duct Length
Once you have settled on the location of the vent, take the measurements. This is necessary to help you verify the exact duct length you will need. Make allowances for bends when you’re taking sizes. Take note of the placement of the fittings while doing so.
Measure the Distance Between the Drain Pipe and the Outside Vent Hole
Start by measuring the distance between the drain pipe and the outside vent hole. Also, check how many vent ducts you will need. Depending on the number of turns you will take, having several elbow fittings and joints will help direct the metal duct to the best course. Just have all the needed materials ready to begin the project right away.
3. Buy the Necessary Materials
Buy all the materials that you will need. This will include an outdoor cap and an ample supply of straight duct and fittings. You can opt to buy either galvanized steel or aluminum duct. But make sure not to mix up the parts.
4. Drill a Test Hole
Using a 1/4-inch drill bit, drill a test hole into the wall or the rim joist. Then, locate the spot outside to ensure no obstruction in that area. This will help you determine the best position to install the vent cap. If the area is too low or has issues, you can fill the hole quickly and try another spot.
5. Drill the Vent Hole
Once you have found the ideal location, drill the vent hole and make certain it fits the siding. Next, rest the top of the vent cap on the lap siding’s high point. Then remove the cap from the duct so that you can take its measurements.
The hole should measure 4 1/4 inches. Bore it with a hole-saw. Be sure to hold the drill as you do firmly. Regularly pull it back to clear the debris and dust. Then continue until you have bored a hole into the rim joist.
6. Install the Vent Cap
Drill Screw Holes
Drill screw holes into the designated area and then screw the vent cap onto it. Look for deep gaps, push foam backer rods through any you find, and seal the area with acrylic caulk.
If you’re drilling a hole into a stucco or brick veneer, use a 1/4-inch masonry bit and hammer drill. Draw a four 1/2-inch circle, drill closely-spaced holes in it, and then break it using a cold chisel. Afterward, cut the wire mesh for the stucco. Then drill through the wood framing using a four 1/4-inch hole saw.
Install a Vinyl Surface Block for Vinyl Siding
For vinyl siding, install a vinyl surface block over it. Trim its edges to match the siding, screw the mounting block onto the surface. Drill slightly oversized holes into the siding to enable movement.
The vent cap can also be installed on vinyl siding by removing an area. Then, insert a vinyl mounting block against the siding. Install the siding afterward to fit around the block.
7. Connect the Elbow Fittings
Make sure the elbow joints are installed right where they are needed. One fitting should be placed on the drain pipe output and another on the outer vent.
Be careful while working with the fittings because they give strength to the structure. Ensure that the solid end of the fitting is connected. Also, make sure that the distance between the elbow fittings is accurate.
8. Cut the Metal Duct
Before cutting the metal duct, put on a pair of heavy gloves to keep your hands protected from the sharp duct. Then, start cutting the vents according to the measurements you’ve taken for the structure.
The tin strips can be used for this. Make sure that the sizes you have cut can fit the elbow fittings. Only one duct section should lead from the washer to the outside.
9. Align the Seam Edges
Once the ducts have been connected, align the seam edges by pulling the long edges of the vents while forcing them together. Form a circle starting at one end of the metal duct as you connect the seams.
10. Connect the First Duct
Connect one end of the first metal duct to the elbow fitting, joining it to the crimped end of the elbow. Make sure the connection is held in place using metal foil tape.
Refrain from using screws, as they cause lint buildup while becoming an obstacle. Avoid using duct tape, as it quickly loses adhesion and doesn’t seal gaps very well.
11. Connect the Remaining Duct Sections
Similar to the first duct, insert the rest of the ducts to the crimped ends of the elbow fittings. Use metal foil tape to hold the ends together. Insert the last elbow joint’s crimped end into the duct cap section, then tape it.
12. Screw the Vent to the Wall
Drill pilot holes into the wall wherein the screws will pass through. Push drywall anchors in the spots to support the fasteners. Then, put a U-shaped pipe strap onto the duct.
Insert the screws to hold the duct, then place a pipe strap for every 6-8 feet of straight duct to reduce the stress on the taped joints.
13. Plug in the Washing Machine
The last step is to plug the washer in and turn it on to try it out. Check outside to make sure that the vent flap is opening correctly.
Again, how to vent a washing machine drain pipe? A vent on the washing machine will prevent the drainpipe to overflow. Plus, the vent can affect the P-trap’s performance and help prevent harmful and flammable gas from reaching your house.
Why Should You Vent a Washing Machine Drain Pipe?
Prevents the Formation of Vacuum in the Drain
Depending on your region’s building code, you may not need to vent your washing machine. Nonetheless, venting a washing machine drain pipe is necessary. It lets air in and prevents the formation of a vacuum in the drain, affecting wastewater removal.
Prevents Overflow
Aside from this, a lack of venting can cause a washing machine to drain slowly. This will cause it to overflow. Having a gap around the drain tube will keep a vacuum from interfering with the flow of the water.
Protects Health and Prevents a Fire Hazard
You must also make sure that you use a drain trap or P-trap to seal sewer gases and keep them from getting inside your home. Sewer gas contains harmful microorganisms which can be hazardous when inhaled, and some gases tend to be flammable. So having a drain tap is an essential measure in protecting your health and preventing a fire hazard.
Keeps Negative Pressures from Pulling the Water out
Venting your washing machine after installing a drain trap is essential. It keeps negative pressures from pulling the water out and rendering the P-trap useless. And, of course, venting your washer will prevent it from constantly overflowing.
How to Vent a Washing Machine Drain Pipe – FAQs
When Should You Vent Your Washing Machine Drain Pipe?
If your washer’s drain fits tightly into the drain, then you need to vent your washing machine drain pipe. This will keep a vacuum from forming and affect the water draining from your washer.
A vent should also be installed if your washer is more than 4 feet away from the vent stack. This is to ensure sufficient room for the washer to drain properly.
Can a Washing Machine Vent Be Shared?
If you’re planning to join your washer with, for instance, the kitchen sink on one drain, they can share a single vent. This is as long as they are close enough distance from each other. Or else, their separate vents can be connected before tying into the main vent stack. The pipes should be extended to the washer and sink traps.
How Big Should the Washing Machine Drain Pipe Be?
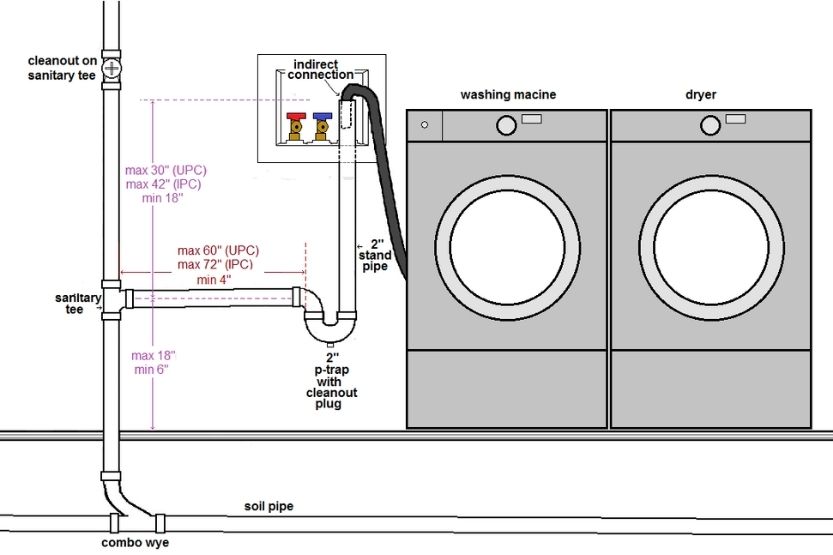
A washing machine drain pipe should be at least 1 1/2 inches ID (inside diameter) to drain properly. A washer drain hose measures 1 1/4 inches OB (outside diameter). Your drain plumbing should be at least 30 inches high for Top Load washers. This height will prevent siphoning of water.
Conclusion – How to Vent a Washing Machine Drain Pipe
If your washing machine doesn’t have a vent, it will cause the drainpipe to overflow because of excessive pressure. Aside from this, it can also affect the performance of the drain trap (P-trap).
This keeps dangerous and even flammable gases from seeping into your house. But if you vent your washing machine drain pipe, you need not worry about risking your home from either hell or high water.
Venting your washing machine is very important in preventing improper outflow and overflow of water. It also helps reduce noise and improve the sluggish performance of your washer.
Vent installation will also help the P-trap function properly, preventing harmful sewer gases from entering your home.
Installing a vent by yourself is easy when you have the right tools and necessary materials and as long as you follow the proper installation guidelines. But if it all seems too difficult for you, you can always get a professional to do the work for you.


![Read more about the article No Hot Water in Apartment [Causes and How to Fix]](https://homecarezen.com/wp-content/uploads/2021/03/no-hot-water-in-my-apartment-300x200.jpg)
![Read more about the article Hot Water Not Working but Cold Is [How to Fix]](https://homecarezen.com/wp-content/uploads/2021/10/hot-water-not-working-but-cold-is-300x200.jpg)